
Imagine you accidentally deleted photos when you try to clear the space or update your iPhone. When favorite memories disappear instantly, it is panic time, but iCloud usually has a copy even when the phone is not showing. Using iCloud, you can recover previously lost photos from previous backups or the Recently Deleted album.
Therefore, this guide assists iPhone users in recovering lost images quickly, even following errors, resets, and device failures. Get to know how thisiPhone data recovery solution works and get your important memories back without stress or technical hassle.
Part 1. iCloud Backup Explained: How It Works
When learning how to recover deleted photos from iPhone, it’s essential to understand the basics of iPhone backups. iCloud Backup is a cloud copy of your iPhone data that you can use to restore your device later if data is lost or the phone is replaced. It makes a safe copy of device settings, app data, messages, and other information that does not already sync to iCloud.
Photos in iCloud Backup vs iCloud Photos
If iCloud Photos is turned off, your photos and videos are included in the iCloud Backup copy. However, if iCloud Photos is enabled, images are already stored in iCloud and are not duplicated in the backup. This means iCloud sync keeps photos up to date across all devices.
So, if you delete a photo with iCloud Photos enabled, it will remove that photo from iCloud and all linked devices, except that it first moves to the iCloud/Photos “Recently Deleted” area for a limited time.
Part 2. Step-by-Step Guide to Restore iPhone Photos from iCloud
To know how this iPhone data recovery solution works and if it’s the best way to recover images, adhere to the given guidelines:
Note That:
- This method replaces all iPhone data with everything from the selected backup.
- It works only if an iCloud backup existed before the photos were deleted earlier.
- Photos must have been included in the backup, not just stored in iCloud.
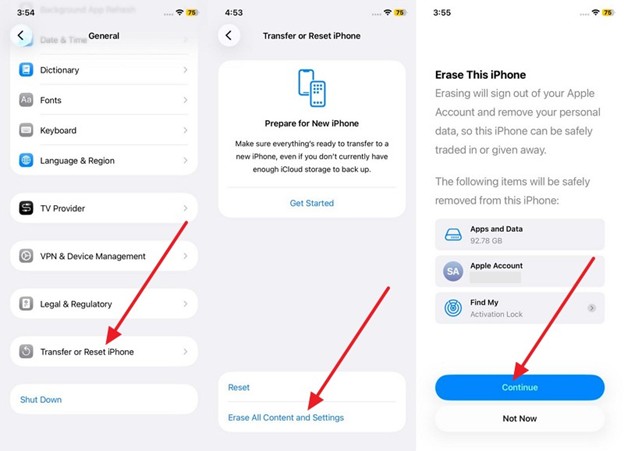
Step 1. Erase the phone first by selecting the “Transfer or Reset iPhone” option from the General Settings. After that, choose the “Erase All Content and Settings” option and pick “Continue” to confirm.
Step 2. Begin the setup again as the phone restarts, and choose the “From iCloud Backup” option on the Transfer Your Apps & Data Screen. Then, enter the Apple ID, verify via code, and “Agree” to the listed terms.
Step 3. Here, select the backup dated before the photos were deleted, then continue on the next screen. Keep your iPhone on Wi‑Fi and charging until backup photos appear.
Part 3. Safely Recover iCloud Photos Using Dr.Fone – iOS Data Recovery
For situations where you don’t want to erase or reset the device, it’s ideal to opt for thebest iPhone data recovery software. In those instances, the Dr.Fone – Data Recovery (iOS) tool enables you to recover 35+ data types, including photos, messages, WhatsApp messages, iWork files, and more. Additionally, users can use it to retrieve WhatsApp View Once messages or restore social app data in just a few taps.
While being the versatile option, it offers the facility to recover multiple data types from iTunes & iCloud backups. Regardless of the function performed, its use is seamless thanks to its fully guided steps. Since these abilities make it an alternative to iCloud backup for image restoration, it’s also suited for beginners who don’t know how to set up iOS.
Simple Guide to Make Photo Recovery Hassle-Free with Dr.Fone
To know how to recover deleted photos from an iPhone, review the simple steps given below and learn how it’s better than iCloud Backup:
Step 1. Open the iPhone Data Recovery Tool
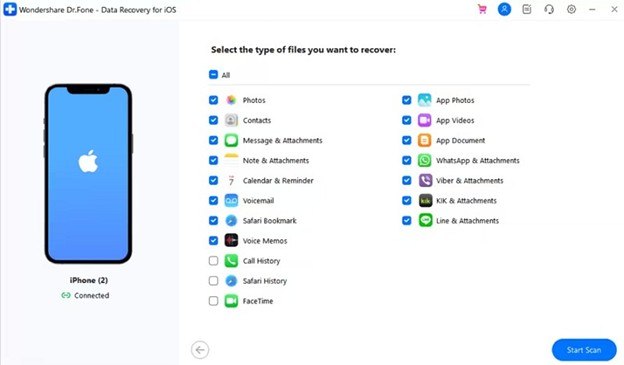
Connect the iPhone to the computer, select the “Recover Data from iOS Device” option from the Data Recovery toolbox, and wait for the iDevice to be detected. Once all files are displayed, select “Photos” and click the “Start Scan” button.
Step 2. Choose the Deleted Photos Option from the Show All List
As the tool restores the images, stretch the “Show All” menu and choose the “Only Show The Deleted” option.
Step 3. Preview the Media & Determine Where You Want to Restore
Lastly, preview and select the photos you want to save, then choose either “Restore to Device or Restore to Computer.”
Why Dr.Fone Beats iCloud Backup for iPhone Photo Recovery
The following reasons demonstrate why Dr.Fone – Data Recovery (iOS) is by far the best iPhone data recovery software and a suitable substitute for iCloud Backup:
- Scan your iPhone or read iTunes/iCloud backups to recover photos safely.
- Preview Camera Roll, Photo Stream, and app photos, then select what to save.
- Use three options: scan iPhone, extract iTunes backup, or download iCloud backup.
- Run from a computer and work with local backups or direct device scans.
- View photo thumbnails and check lost images before recovery to confirm safety.
- Gives the facility to filter restored media and choose where to save them.
- Limits the need to erase the iPhone or replace everything, unlike iCloud Backup.
- Gives complete control over the process and is suitable for amateurs.
- The tool is compatible with all iOS devices and versions and is safer to use.
Part 4. Best Practices for iCloud Data Recovery
Till now, you know how to recover deleted photos from an iPhone with iCloud Backup and Dr.Fone, with a clear understanding of which method is best. However, if you prefer to erase the phone, regardless of the reasons, follow the given tips:
| Practice | Why It Matters | How to Do It |
| Check the Recently Deleted folder first | Photos remain for 30 days before permanent deletion | Open Photos app > Albums > Recently Deleted > Recover |
| Verify iCloud backup date | Ensures backup contains the photos or data you need | Go to Settings > iCloud >Manage Storage > Backups > Check date |
| Use stable Wi‑Fi and power | Avoids errors or interruptions during restore | Connect to Wi‑Fi and plug in your iPhone until recovery completes |
| Restore selectively | Protects existing data from being overwritten | Use recovery tools like Dr.Fone to restore specific photos or files |
| Keep regular backups | Provides protection against future data loss | Enable automatic iCloud Backup and update frequently |
Conclusion
To sum up, this guide has explained which iPhone data recovery solution is best for recovering photos. Hence, review the given instructions in detail and know which method is safe and easier. If you prefer to keep the data intact and have a simple restoration method with the ability to preview restored images, Dr.Fone – Data Recovery (iOS) is suggested.